
When it comes to metal detecting, there are several skills that you should learn as soon as possible! One of those skills is the ability to read your metal detector properly … In fact, This one skill will make a huge difference in terms of the quality of finds you will come up with …
… So, how to read a metal detector? This highly depends on the detector you are using. But most recent models rely mainly on 3 Indicators: The VDI, the Tone and Depth indicators. A combination of those will give you an idea not only on the depth, but also on how conductive your target is. Thus, you should approximately tell what you are about to dig.
If you are on a Budget and looking for an Easy-to-Read Metal Detector, then you probably should otp for this Garrett Model (Check it Here at Amazon)!
Why it is important to read your metal detector properly?
Once your detector will start beeping, this means one thing, your target is a metal that has enough electrical conductivity to be detected! That’s it …
… However, if you want to have an idea on what you are about to dig, here where reading your machine comes to place … Otherwise, you might be digging everything and anything! Which is not a fun thing to do, Right?
I understand that at the beginning, you should be digging almost every sound you hear. Yet, that wouldn’t be wise to carry out doing so in the long run …
… The digging process is exciting but is also painful if done more than necessary! Being able to predict your target is a necessity at a certain point.
A good way to get familiar with the detector’s tones is to dig up small patches of land in your backyard and bury different materials such as aluminum, gold, nickel, iron, and steel. Then use your device over each of these buried metals to practice and get used to the different pitches of the tone.
These are the elements you can read on your detector …
The next 3 indicators are important to somewhat predict your targets! Let’s go through each one of those:
1. The Tone
All metal detectors make a sound once the coil’s magnetic field covers a conductive target. The tone varies depending on the manufacturer and the model itself. You should not be stressed about that since you will naturally get used to the different tones!
A good way to start is by testing coins out! In fact, coins tend to produce a solid and distinctive sound that is hard to miss…
… It will start and stop suddenly, then going quickly from silent to full volume, and then back to silent as you move away from that place. This should happen each time you sweep the search coil over that place.
Trash items (ferrous, iron) have a choppy and broken tone, and items that can prove to be valuable have a solid and clear tone.
Additionally, as the center of your search coil is closer to the target, the audio tone should be louder (this also depends on the tones levels your machine offers).
When the coil moves away, the audio response becomes quieter. Some model will also change the pitch of the tone in relation to the target.
So the volume and pitch both will be higher the closer you are to the target, and vice versa, as you move away.
Keep in mind that detectors that offer a custom mode, like the Fisher F44 (Check it Here at Amazon), will provide you with the possibility to custom the tones depending on your target.
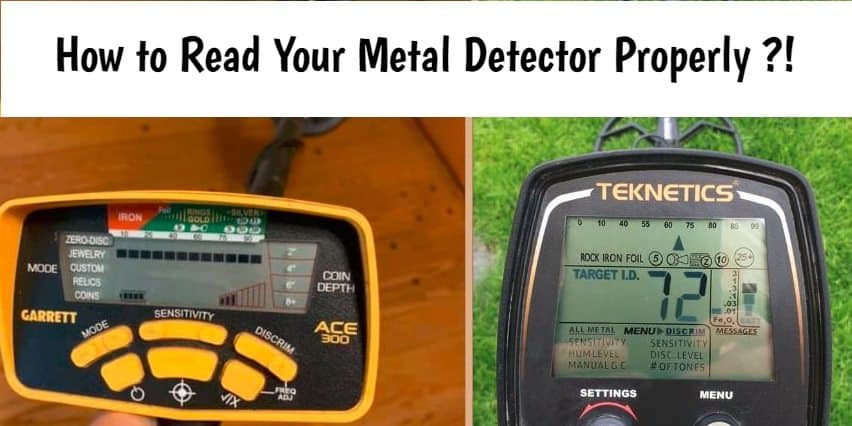
2. The VDI
VDI (Visual Display Indicator) is another way to easily identify your target! The VDI scale varies depending on the models and on manufacturers, as well.
For example the AT Pro (Check it Here at Amazon) the VDI value could go anywhere from 0 to 99 which is a wide range that should give you more accuracy.
There are other models like the Minelab Equinox 800 (Check it Here at Amazon) that have negative numbers or numbers lower on the scale! These typically indicates iron and positive numbers or numbers higher on the scale indicate other metals such as gold, silver, coppers, and brass.
The VDI numbers can give you a fair idea of what type of target your search coil is over. But, at the same time, VDI can be affected by ground minerals as well as other targets in a small area…
…For example, if there is a nail lying next to a coin, then it might throw off the VDI reading.
This is why the best to listen to the audio tone as the first indicator of whether to dig or not.
3. The depth
A decent detector can see stuff around 6 to 10 inches below the ground for coin-sized items!
The truth is that the detection depth is always only an estimate. Yet, it is still useful to tell you how deep you will dig, so you won’t dig more than necessary!
For example, the Garrett Ace 300 (Check it Here at Amazon) has a little side bar that estimate the depth anywhere from 2 up to 8 inches! For someone like me, that’s extremely useful … Indeed, if the indicator says, for example, 2 inches, you won’t need to dig 8 or 10 inches underneath!
The sensitivity settings also play a role. In fact, if the sensitivity is set to a good level, then even smaller items can be found at a great depth.
Learn more about what makes metal detectors go deeper!
How to read an Analog machine like the Bounty Hunter Tracker 4?
![]()
The Bounty Hunter Tracker IV (Check it Here at Amazon) is hailed as an excellent beginner’s model! It operates at 6.7 kHz and has 3 search modes and an adjustable stem.
There are just two knobs and dual audio tones, so it is straightforward to learn to read this type of analog machine. The analog meter will show the signal strength coming from the target. This will provide a rough indication of the depth and size of your target.
There is no digital target ID, iron audio, or depth indication available in an analog detector, making it much easier for children and entry-level detectorists to learn to use.
The 3 adjustable settings include search mode, discrimination, and sensitivity. The higher the numbers are for sensitivity, it means that the deeper the detector can detect a target at significant depth.
There is only one knob for discrimination, and the higher the setting, then any tone you hear is likely not iron.
Don’t worry, the learning curve is very very short for such a model!
Reading a classical detector like the AT Pro …
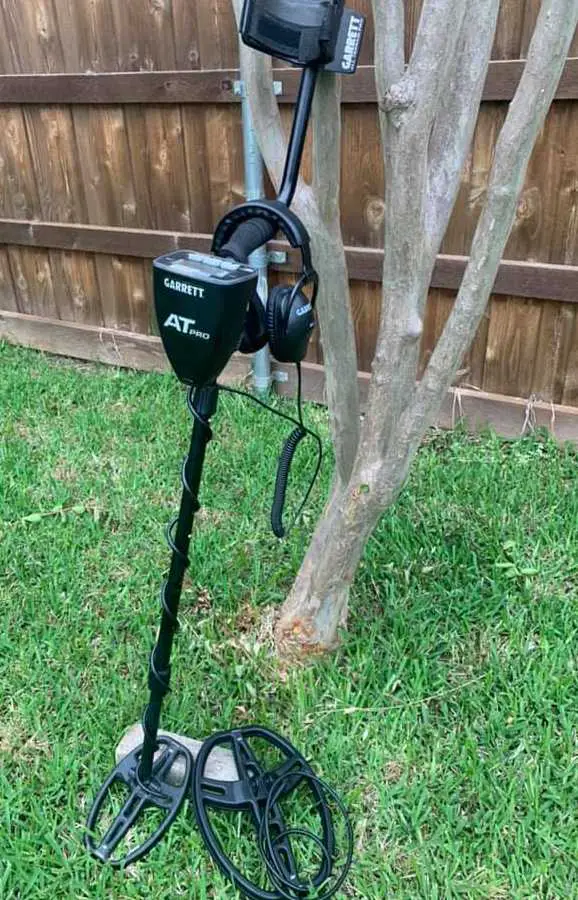
The Garrett AT Pro (Check it Here at Amazon) is an all-purpose, all-terrain and very popular machine! It can make a decent swipe at finding gold nuggets as it has a 15 kHz frequency and ground balance settings.
AT Pro is great at finding smaller targets and also provides excellent target separation!
You can read the device with its two audio modes – Pro and Standard … You can use both modes with the three search moves …
… The standard mode comes with three separate audio tones depending on the metal found. The signature Garrett bell tone for detecting coins is there in the AT Pro model as well, but apart from this, the audio tones do not provide any further information about what your target could be.
The Pro mode comes with more audio information about the target depth and composition, as well. The deeper the targets, the fainter the tones, and you may also hear additional snapping sound depending on the metal’s composition.
It takes some practice to use a classical model such as the AT Pro, but if you are new to detecting, then start with the Standard mode.
There is also a large numerical target ID in the center of the screen. It has a 0-99 scale, and it provides highly accurate data on what your target is.
Discriminated iron objects can also trigger an audio tone, helping you decide whether the target is worth digging.
Reading a technologically advanced model like the Equinox 800 …
The Minelab Equinox 800 (Check it Here at Amazon) represents the new detectors generation!
The Multi-IQ feature it comes with allows you to operate on several frequencies all at the same time or separately!
Indeed, it can operate on 5 single frequencies – 5, 10, 15, 20, and 40 kHz, plus the multi-frequency mode for using all the frequencies together.
This video below gives you an idea on its reading:
How are these metals indicated on metal detectors?
Below I list 5 common targets and how they are generally perceived using your beloved machine:
(Please note that these results are not typical, this highly depends on the actual machine you are using, the ground conditions and so many other factors …)
1. Gold
Gold gives a solid, mellow sound on a metal detector, similar to tones produced by lead or brass.
How deep a gold nugget gets picked-up also depends on the size of the nugget. For example, a 2-penny weight nugget will be picked up to five inches deep into the ground, while a 5-penny weight nugget might be picked up eight inches deep into the same ground with the same detector.
The closer the target is to the surface the better the sound will sound, this also applies to size!
On a VDI scale of 0-100, small gold items are low on the scale and large gold items are high on the scale. For example a small gold item can have a target ID between 15 to 20. A larger sized gold item can fall between 50 to 55, while a really big gold nugget will fall in the range of 80 to 85.
Learn more about detecting the gold metal!
2. Platinum
Platinum is a pretty low conductive metal, and when the platinum target is suspected to be small in size, it will read very low on the VDI scale, even sometimes dipping into the ferrous range. The range between 0 to 5 is typically the sweet spot for earrings, thin gold chains, small women’s rings, and other small platinum items.
The VDI numbers will be different for different rings because platinum is usually alloyed with various metals, which changes the conductivity. Nobody makes pure platinum rings, and a KT stamp inside does not guarantee that it is an accurate percentage of the platinum.
Learn more about detecting the Platinum metal!
3. Tungsten
Tungsten is a detectable metal and thereby can be picked up! In most cases, a tungsten target tends to have a tone, and target ID similar to gold, meaning the target ID for tungsten should hit between 40 to 45+.
If the item is bigger in size, then it can even give a target ID in the 60s.
Learn more about detecting the Tungsten metal!
4. Lead
Modern machines have the ability to find lead. However, there are some devices that can detect lead better than others due to its low conductivity, especially if it is buried pretty deep underground. The conductivity of lead is as bad as stainless steel.
It is a non-ferrous and non-magnetic metal along with aluminum, gold, and silver, and it can, therefore, give off the highest tones on some detectors.
The target ID for lead is around 70 to 79.
Learn more about detecting the Lead metal!
Conclusion
I really hope that this article has given you enough useful information! I really want you to be able to always get the best out of your detector, and reading your machine is crucial in that sense…
… So, give yourself enough time to learn your beloved machine … So, Yea, Go out there and have some Fun!